Friday, July 29, 2011

Element to Element Binding in Silverlight

Silverlight allows binding of UI element properties. This is one of very useful feature provided by silverlight. This is not a big topic to cover but you guys can use this post as a reference because you may forget the syntax very often.

In this example I have two slider controls which will change the width and height of a image  control.

silverlight element binding


<Slider x:Name="SliderWidth" 
                MaxWidth="400" MaxHeight="300" 
                Grid.Row="0" Maximum="400" Value="100" />
        <Slider x:Name="SliderHeight" 
                MaxWidth="400" MaxHeight="300" 
                Grid.Row="1" SmallChange="1" 
                Value="100" Maximum="300" />
        <Image Grid.Row="2" Source="/Slv-ElementBinding;component/Images/Pallipuram%203.jpg" 
               Width="{Binding Value, ElementName=SliderWidth}" 
               Height="{Binding Value, ElementName=SliderHeight}" Stretch="Fill" />

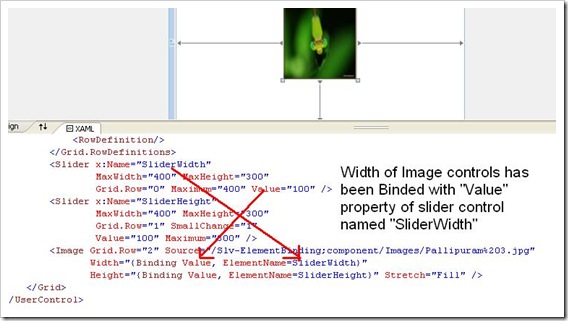
In the above picture you can see the value property of slider control is binding with the width property of image control.  So whenever you change the slider control the image width get changed according to the value of the slider.


You can find the source code here.


Happy coding guys…

Tuesday, March 29, 2011

New Learning : Microsoft WebMatrix

Microsoft WebMatrix

Microsoft WebMatrix is a web development tool from Microsoft. It is providing everything you need to develop website applications like built in templates, website from web gallery etc. Moreover in WebMatrix it is really easy to customize your website with the tools provided by the WebMatrix application. There is no need to switch between different application customize your website. WebMatrix provide an easy way to publish your website, it will even help to find the hosting provider within the WebMatrix application to make your application live.


Creating website in WebMatrix

To create website in WebMatrix first you need to install it in your machine. You can download WebMatrix from following location in Microsoft website. Its free to download.

http://www.microsoft.com/web/gallery/install.aspx?appid=webmatrix

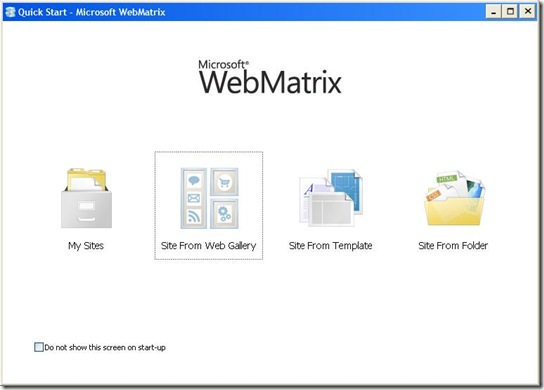
Once you launched the WebMatrix application you can see four options as following figure:

1

1. My Sites
    Open the existing website you have created recently in WebMatrix
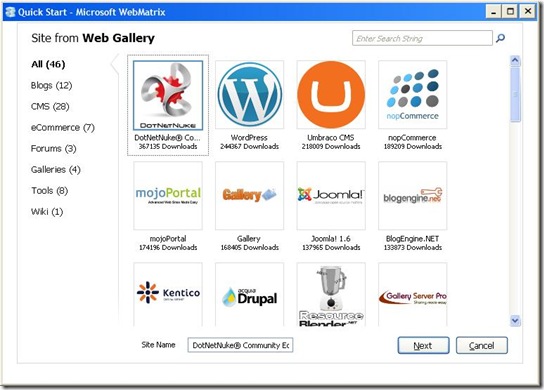
2. Site From Web Gallery, where you can create website from variety of application gallery such as WordPress, Joomla, Drupal, phpBB etc.

2

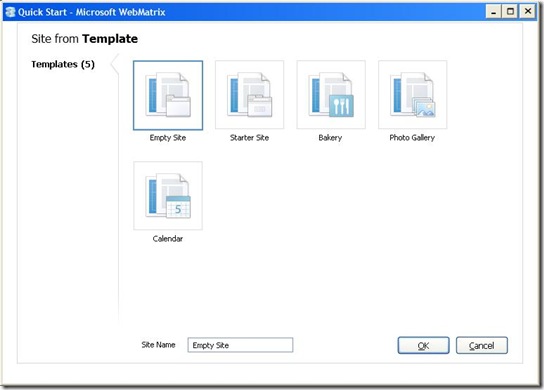
3. Site from Template, where you can create website based on different templates provides by WebMatrix as shown in figure below:

3

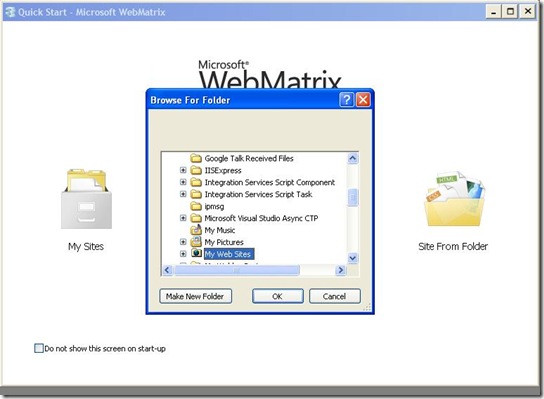
4. Site from Folder, which will allow you to create a website from an existing folder.

4

Getting started tutorials are available in Microsoft website. See the following links to get more idea about Microsoft WebMatrix.

Web Development 101 using WebMatrix
http://www.microsoft.com/web/post/web-development-101-using-webmatrix

Installing and publishing a WordPress blog with WebMatrix
http://www.microsoft.com/web/category/wordpress

Watch videos from the WebMatrix launch at CodeMash 2011
http://www.microsoft.com/web/enter/

Thanks!!!!

Friday, March 25, 2011

How To: Create Add-In to modify the source code in Visual Studio

Create Add-In in visual studio

We can extend the existing Visual Studio environment by automation techniques provided by Visual Studio and DotNet framework. We can add our own features to the Visual Studio by creating Add-Ins. Add-In is a complied DLL which run in visual studio IDE.

Here in this blog post we are going to create an Visual Studio Add-In which will;

1. Find and change the name of the Namespace defined in c# source code
2. Find and change the name of the Class defined in c# source code
3. Find and change the name of the Property defined in the c# source code
4. Find and change the name of the function defined in the c# source code
5. Find the attributes defined in a class and if required we can change the values defined inside the attribute
6. Find the attributes of properties defined in a c# source code file.
7. And more over we will be able to iterate through the C# source code and find out the Namespace, Class, Functions, Properties, Delegates, Events and Struct, we can do any kind of manipulation with in the code.

How to create Visual studio Ad-In:

Open VS 2008 got to File Menu -> New -> Project -> Other Project Type -> Extensibility -> Select Visual Studio Add-In

My project name is "VSAddIn".  Click on "Ok" you will get the following screen click on next

1

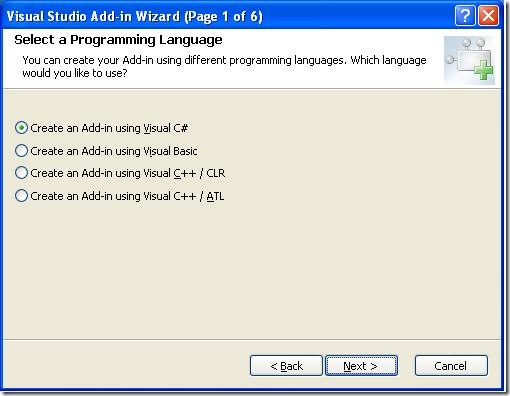
Select the programming language you use as shown in figure below

2

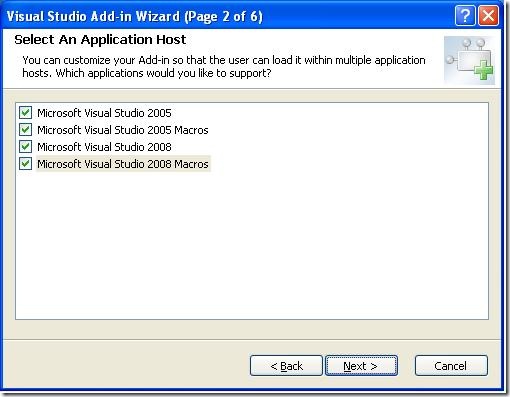
Select the application host as shown in figure below

3

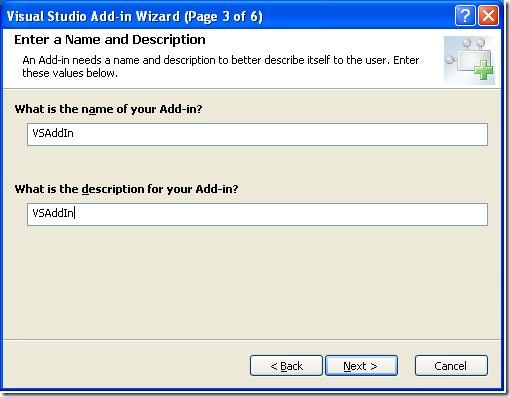
Enter the name and description as shown in below image

4

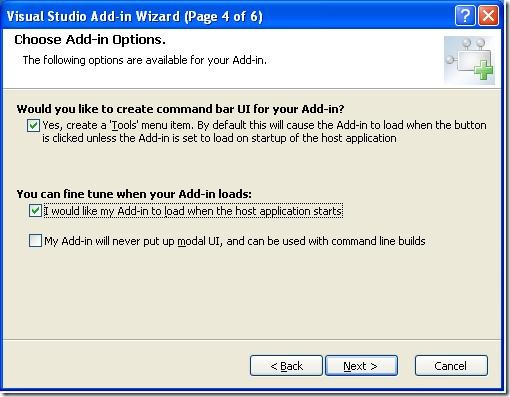
You have certain option to configure the way Add-In shows in VS IDE.

Check the first option to show the Add-In in Tools Menu Items
Check the second option to start the Add-In when host application startup
Third one, keep it unchecked

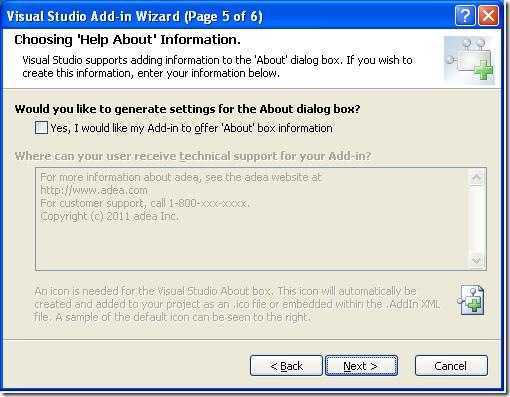
5

I don't have About information

6

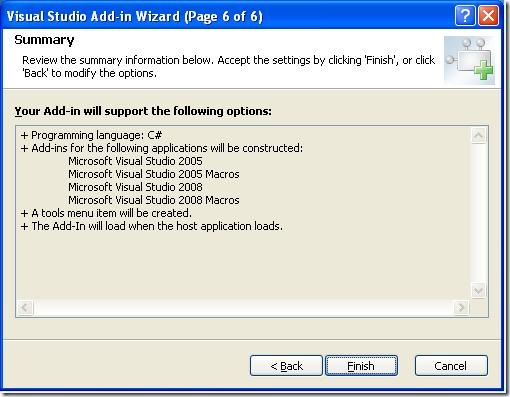
Finally, Click on finish

7

Following is my code to implement the above described.

   1: public void Exec(string commandName, vsCommandExecOption executeOption, ref object varIn, ref object varOut, ref bool handled)
   2:         {
   3:             handled = false;
   4:             if(executeOption == vsCommandExecOption.vsCommandExecOptionDoDefault)
   5:             {
   6:                 if(commandName == "VSAddIn.Connect.VSAddIn")
   7:                 {
   8:                     handled = true;
   9:                     // Call the function which will do the code analysis and 
  10:                     // modification to your c# code 
  11:                     AnalyseAndModifyCode();
  12:                     return;
  13:                 }
  14:             }
  15:         }


   1: private void AnalyseAndModifyCode()
   2:         {
   3:             foreach (Project project in this._applicationObject.Solution.Projects)
   4:             {
   5:                 foreach (ProjectItem pItem in project.ProjectItems)
   6:                 {
   7:                     AnanlyseAndModifyRecursive(pItem);
   8:                 }
   9:             }
  10:         }


   1: private void AnanlyseAndModifyRecursive(ProjectItem pItem)
   2:         {
   3:             if (pItem.Name.EndsWith(".cs"))
   4:             {
   5:                 FileCodeModel2 model = (FileCodeModel2)pItem.FileCodeModel;
   6:                 if (model != null)
   7:                 {
   8:                     foreach (CodeElement codeElement in model.CodeElements)
   9:                     {
  10:                         ExamineCodeElement(codeElement);
  11:                     }
  12:                 }
  13:             }
  14:             foreach (ProjectItem pChileItem in pItem.ProjectItems)
  15:             {
  16:                 AnanlyseAndModifyRecursive(pChileItem);
  17:             }
  18:         }


   1: private void ExamineCodeElement(CodeElement codeElement)
   2:         {
   3:             try
   4:             {
   5:                 if (codeElement.Kind == vsCMElement.vsCMElementClass)
   6:                 {
   7:                     CodeClass cClass = (CodeClass)codeElement;
   8:                     MessageBox.Show("Class name is " + codeElement.Name);
   9:                     
  10:                     foreach (CodeAttribute attr in cClass.Attributes)
  11:                     {
  12:                         // Name of the attribute
  13:                         if (!string.IsNullOrEmpty(attr.Name))
  14:                         {
  15:                             MessageBox.Show("Attributes Defined for class " + codeElement.Name + " is " + attr.Name);
  16:                         }
  17:                         // Values Defied in attribute
  18:                         MessageBox.Show("Value of attribute is " + attr.Value);
  19:                     }
  20:  
  21:                     // To change the name of the class defined in the c# source code file 
  22:                     cClass.Name = "NewClassName";
  23:                 }
  24:                 if (codeElement.Kind == vsCMElement.vsCMElementProperty)
  25:                 {
  26:                     CodeProperty cProperty = (CodeProperty)codeElement;
  27:                     MessageBox.Show("Property name is " + codeElement.Name);
  28:                     foreach (CodeAttribute attr in cProperty.Attributes)
  29:                     {
  30:                         if (!string.IsNullOrEmpty(attr.Name))
  31:                         {
  32:                             MessageBox.Show("Attributes Defined for property " + codeElement.Name + " is " + attr.Name);
  33:                         }
  34:                     }
  35:  
  36:                     // To change the name of the propert defined in the c# source code file 
  37:                     cProperty.Name = "NewClassName";
  38:                 }
  39:  
  40:                 if (codeElement.Kind == vsCMElement.vsCMElementFunction)
  41:                 {
  42:                     CodeFunction cFucntion = (CodeFunction)codeElement;
  43:                     MessageBox.Show("Function name is " + codeElement.Name);
  44:  
  45:                     foreach (CodeAttribute attr in cFucntion.Attributes)
  46:                     {
  47:                         if (!string.IsNullOrEmpty(attr.Name))
  48:                         {
  49:                             MessageBox.Show("Attributes Defined for function " + codeElement.Name + " is " + attr.Name);
  50:                         }
  51:                     }
  52:  
  53:                     // To change the name of the property defined in the c# source code file 
  54:                     cFucntion.Name = "NewcFucntionName";
  55:                     
  56:                 }
  57:  
  58:                 if (codeElement.Kind == vsCMElement.vsCMElementNamespace)
  59:                 {
  60:                     CodeNamespace cNamespace = (CodeNamespace)codeElement;
  61:                     MessageBox.Show("Namespace name is " + codeElement.Name);
  62:  
  63:                     // To change the name of the namespace defined in the c# source code file 
  64:                     cNamespace.Name = "NewcNameSpaceName";
  65:                 }
  66:  
  67:                 if (codeElement.Kind == vsCMElement.vsCMElementStruct)
  68:                 {
  69:                     CodeStruct CodeStruct = (CodeStruct)codeElement;
  70:                     MessageBox.Show("Struct name is " + codeElement.Name);
  71:  
  72:                     // To change the name of the Struct defined in the c# source code file 
  73:                     CodeStruct.Name = "NewcStructName";
  74:                 }
  75:  
  76:                 if (codeElement.Kind == vsCMElement.vsCMElementEnum)
  77:                 {
  78:                     CodeEnum CodeEnum = (CodeEnum)codeElement;
  79:                     MessageBox.Show("Enum name is " + codeElement.Name);
  80:  
  81:                     // To change the name of the Enum defined in the c# source code file 
  82:                     CodeEnum.Name = "NewcEnumName";
  83:                 }
  84:  
  85:                 if (codeElement.Kind == vsCMElement.vsCMElementDelegate)
  86:                 {
  87:                     CodeDelegate CodeDelegate = (CodeDelegate)codeElement;
  88:                     MessageBox.Show("Delegate name is " + codeElement.Name);
  89:  
  90:                     // To change the name of the delegate defined in the c# source code file 
  91:                     CodeDelegate.Name = "NewcDelegateName";
  92:                 }
  93:  
  94:                 if (codeElement.Kind == vsCMElement.vsCMElementEvent)
  95:                 {
  96:                     CodeEvent CodeEvent = (CodeEvent)codeElement;
  97:                     MessageBox.Show("Event name is " + codeElement.Name);
  98:  
  99:                     // To change the name of the Event defined in the c# source code file 
 100:                     CodeEvent.Name = "NewcEventName";
 101:                 }
 102:  
 103:                 foreach (CodeElement childElement in codeElement.Children)
 104:                 {
 105:                     ExamineCodeElement(childElement);
 106:                 }
 107:             }
 108:             catch
 109:             {
 110:                 //
 111:             }
 112:         }
You can find the complete source code here. The .Zip file contains two projects one is the Add-In application and the other one is a sample project to test the Add-In functionalities.


To test the project first follow the below steps:


1. Build the “VSAddIn” project.


2. Once you build the solution you will get a Add-In File called “VSAddIn.AddIn” in your project folder. Copy the file and got to My Documents –> Visual Studio 2008 –> Add-Ins and paste it there. 


3. Edit that Add-In file in notepad. You can find the xml tag <Assembly>Project1.dll</Assembly>. Change the path to the Project1.dll file in you project debug folder. Now open the sample project application go to Tools menu You can find the Add-In “VSAddIn” .


4. Again go back to the Add-In Application project got to Tools Menu Click on Attach process. A number of processes will be listed over there, select the sample project application. Now the Add-In application is ready to debug.


5. Now got to the sample project application and select the “VSAddIn”.


If you need further assistance on how to extend this article according to your need please let me know via comments.


Thanks!!!